Following on from my last post, there is one last aspect of human brain behaviour that is worth knowing about in photography before we get into the nitty gritty. I’ve borrowed this acronym from website programming – it stands for “What You See Is What You Get”.
But nothing could be further from the truth in photography!Hopefully I’ve already made you realise that from the second your eyelids open, your brain is manipulating the images it sees in order to make the world a more understandable place for you to live in.
*
Cameras, while being able to manipulate images a little as they are captured, nevertheless don’t come to close to what the brain is doing every nanosecond of the day.
Now. There’s one more thing you need to appreciate and let me demonstrate how it works. That asterisk above isn’t a typo. It’s a focal point. I’m not trying to create an optical illusion, but I’m showing you how attentive and focused your eyesight can be – or rather, how focused your brain is being. Just stare at the asterisk a second, and then come back here.
While you were concentrating on the asterisk, what else could you see? the white “paper” behind it obviously. Maybe you are slightly conscious while you are reading this that there are borders and icons around the edge of your screen. Maybe you can see the screen bezel in your peripheral vision? Now shut your laptop lid (or turn over your tablet or phone) and look again. Yeah. I’m sat in my living room. My laptop is perched on the sofa which I can see but I’m not really aware of, there is a large glass cabinet directly in my field of view but its well out of focus and of no interest – there’s our indoor rabbit in his cage to the left of me and the door into the hall on my right. And the walls surrounding me. All visible,yet somehow invisible…


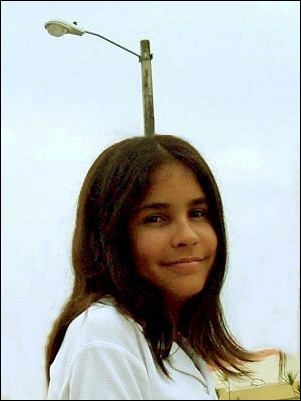
What my mind is seeing compared to the ACTUAL view…
A human eye doesn’t have any zoom lens attachments, and just sees everything in its whole field of view. But your brain knows what you are looking at, and a little like a digital zoom, it can just zoom in to the important stuff and “block” out the extra peripheral signals and make your attention focus on a small area of the view available to you.
This can be quite deceiving when you look through a viewfinder to compose your picture. Your brain instantly begins this jedi mind trick and draws you right into the subject. You can see every detail, in close up, and yet when you see the finished image, what you were focusing on is a mere dot in the middle of your print. Come on, be honest, it has happened to you too. You must have been slightly disappointed or taken aback by how different, or uninspiring a photo is, compared to how you remember the scene in your mind.


The shot I THOUGHT I could see, compared to the one I was actually snapping!
This isn’t a huge problem if you have a good zoom or a high pixel count so you can crop the photo afterwards, but the first thing you need to do is start to appreciate what you are ACTUALLY seeing, rather than what you THINK you are seeing.
You need to train your eye to stop looking through your viewfinder directly at the object that has taken your fancy, and check the rest of the surrounding image – this is how I do it:
1) Let’s say I fancy taking a photo of the building in the centre of my viewfinder –

2) My mind is focused on the building (red circle) To my brain, the building is dominating the shot and I’m not really aware of the peripheral “noise”.
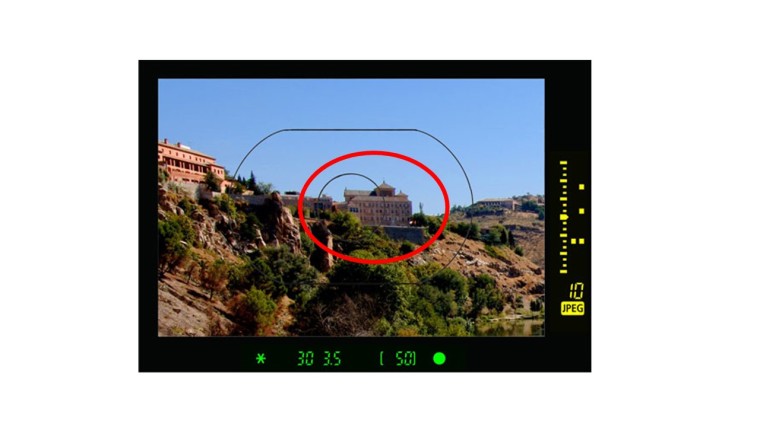
3) The first thing I do when composing the shot is to check the four corners of the viewfinder – physically force my eye to “pull back” out of the image, and directly look at the edges of the viewfinder corners (Yellow circles).

4) instantly the picture takes on a new perspective, I now see the border of the finished print rather than the focal point of the photo, and I’m aware of all the wasted space in the image (orange squiggles) and just how small my target is in the whole scene!

Imagine how small that building would be in a 6 x 4″ print!
Of course, you may be aiming to capture the surrounding scenery, but that’s another post.
Ok, that’s enough about the brain and how it plays tricks on you. In the next posts we will try to apply some of these aspects while looking at your camera settings.
But to finish this post, let’s have a look at a common problem that most people encounter where they are so focused on the subject matter, they have not examined the whole shot:


More on composition later, but for now, I want you to go and grab your camera, set the zoom (if it has one) to about halfway between telephoto and wide, and try out what we’ve discussed. Pick a few “targets”, photograph them, them try to remember the scene in your head and compare with the actual shot.
Have fun until next time!
To be continued.

