It has become increasingly obvious to me that to teach nearly 50 years of photography experience is possibly beyond this blog – and there are many other blogs already doing it better than I can. But what I want to do is ensure you have an understanding of WHY the camera reacts the way it does, depending on the settings you use.The other problem is that we are looking at a range of cameras from very basic automatic settings on compact models to very complex settings on Bridge / DSLRs which can (if desired) require the photographer to set all the various settings manually. I think in hindsight I will have to save some of my top DSLR tips for an advanced course. So what I intend to do is continue with my current theme, concentrate on the basic settings and where applicable just comment on the more advanced settings offered by the more complex cameras.
Choices so far
Remember, one of my aims is to help you decide which type of camera is for you.
So far we have the following comparisons to make:
a) Light and Compact v Heavier and bulkier?
b) Easy to carry around v Cumbersome and obtrusive?
c) Mostly daylight photography (tiny lens ok) v Dim light scenes (larger lens preferred)?
d) Mostly automatic (little creative input) v Multiple settings (greater control of image)?
When I’m comparing, I’m going to be looking at my own three current cameras:
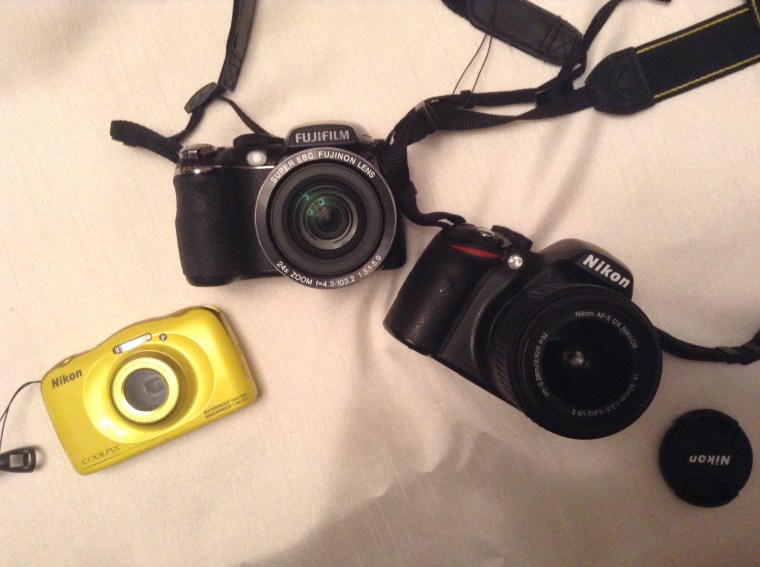
I have a Nikon coolpix S33 which I bought for underwater holiday shots (hence my choice of bright yellow), a Fujifilm Finepix S4200 bridge camera, and my trusty Nikon D3200 DSLR with which I do most of my work.
For a start, going back to a previous post, look at the lenses on the cameras. The Coolpix has a tiny lens by comparison to the others, and the bridge camera, although it looks like it has a wide front lens, actually is mostly lens body – the glass is smaller than it looks, but much bigger than the Coolpix. The D3200 has the largest diameter lens of them all.
I like the coolpix because its waterproof and light to carry and I don’t have to worry about getting sand in it on the beach. The bridge and DSLR cameras are neither waterproof or sand resistant – and due to the higher cost of them, I wouldn’t contemplate risking them on a normal beach outing! The bridge has better controls, and works better in low light than the Coolpix, but doesn’t produce as good images as the DSLR – but it is slightly lighter, and considerably cheaper. I once dropped the bridge camera from a great height and fortunately it bounced. But had it smashed beyond repair it wouldn’t have been a huge financial loss. By comparison, my DSLR, with heavy Nikon flashgun attached, once broke free from a very cheap tripod (lesson learned!) and again hit the concrete with some force. Fortunately the camera sustained no damage as it landed on the flashgun which took the full force of the impact. But I lost £250 worth of flashgun as it shattered into a million fragments. I still don’t know how the camera came out of that without a scratch!
Anyway I digress. If I need top quality photos, if it’s a special occasion, or I know I’m going to want to get creative with the lighting, then it’s a no brainer. Out comes the DSLR.
Getting the right exposure
So. We were talking last time about exposure. Remember? You might want to go back and read Tip 5 again to refresh your memory.
I’m going to assume you know how to get into your camera’s settings menu – if not, you need to go and figure it out. On my Coolpix, the settings menu has absolutely no exposure control. Instead, you are asked to select from a very small selection of scenes – ‘night scene’ and ‘backlit’ being the only real options. It also has a “food” setting which I’ve never heard of and do not know what it achieves!

‘Backlit’ means basically the light source is behind your subject e.g. you might be taking a photo of a person with the sun directly behind them – in this circumstance your subject’s face will be heavily in shadow, and normally your camera would set the exposure for the sunlit background and create a silhouette of your subject. By selecting backlit, you are telling the camera to adjust the exposure and let much more light in than it thinks it should, thus allowing the subject’s face to be properly rendered – at the expense of the background which will now look washed out (lets start using the correct terminology – “Over exposed”). ‘Night scene’ usually opens the lens aperture to the fullest, to allow the maximum light in, and slows the shutter down so it stays open longer, thus trying to get the maximum amount of light to the sensor. It may also adjust the ISO setting up from 100 or 200 to 400 or 800 + to make the sensor much more sensitive to the limited light available.
Compact equals restrictive
The point is, on compacts, you often have no more control over exposure than telling the camera the type of scene you are shooting, and hoping it can figure it out. In fairness, 80-90% of the time the camera will do a decent job, but occasionally there will be quirks in the lighting levels that fools the camera’s metering and causes a photo to be badly exposed.
On the bridge camera, things get a little more sophisticated. For a start, I have more settings to choose from – this time from a dial on the top of the camera:

On this I have a sports mode (SP), a panoramic mode (quite a good feature we will look at later) P for Program mode, which means the camera controls all the exposure requirements, SR (auto) – Scene Recognition means that you tell the camera what type of scene it is, and it adjusts accordingly. Or sometimes the camera can figure out the type of scene and set up itself. On this camera, there is a better and wider range of scenes e.g.:


You might find on better compacts you also have greater choice of scenes, but the principle is the same – you select the scene, and the camera changes the exposure settings based on what it knows is best. For example, in the ‘Snow’ Setting above, it knows that due to all the reflected light from the snow, a normal image would be vastly over exposed, so it will knock a bit off the exposure setting to compensate by adjusting a special setting.
The all important EV…
This special setting is known as the EV – Exposure value, and although many people do not know of its existence, or do not understand what it does, on many bridge cameras and (I expect) all DSLRs you can raise or lower the target exposure from -3.0 to +3.0 “EV” in 0.3 increments – I know that sounds technical, but it basically means you can reduce or increase exposure a little bit at a time to from the camera’s metered setting, in order to compensate for odd lighting levels.
On bridge and DSLR camera, you have the opportunity to do this manually by pressing the appropriate EV control button, and using the camera cursor keys to nudge it up or down a bit on the – / + scale that appears on screen (bottom right).
So what does all this mean?
Well the best way to show you is go and try it if you have this option. Take a photo with EV at 0, then take photos knocking the EV down by a increment at a time until you are at -3.0. then go back to zero on the scale, and take pictures from 0 to +3.0 EV. When you flick through from -3.0 to +3.0 images, you will soon see the difference the setting makes to your normal images.
Here are three shots of the same subject, in the same lighting, at -3.0, 0 amd +3.0 EV, using my bridge camera. Notice how the detail on the camera disappears in an under exposed shot, while the detail of the tablecloth is burnt out and disappears in the over exposed shot :

I have exactly the same EV adjustment on my DSLR, operated again with a conveniently placed EV button and the cursor keys. I can see the setting either on the back screen, which just displays information during the shot (unlike the bridge, which having no viewfinder displays the image on the back screen, you use the viewfinder on the DSLR to take the shot and not the back screen) or I can see the EV value displayed in the viewfinder display – this saves keeping having to lower the camera to look at the info screen. On some DSLR’s you can switch to backscreen to view the shot, but it is not comfortable to hold a DSLR at arms length while you watch the back panel in my opinion, and increases the risk of camera shake (more on correct posture later). On this shot of my DSLR camera’s info screen, you can see the EV value in yellow, and the EV scale just under the shutter speed and aperture values:

The way to use this feature is get used to taking more than one picture at a time. In the old days of film we would take what where called “bracketed exposures”. Put simply, we would take a picture at the recommended meter setting, then take one photo with the aperture one stop open too much, and then one stop closed down too much. When the three photos were printed, you were able to decide which was the best exposure. With digitals, I would recommend you do the same. Take a photo, then check it in the viewfinder, and if the subject looks over or under exposed, then take the photo again with the EV adjusted a couple of points up or down the scale as required.
Forcing the camera to take on board your wishes…
Did you notice on the picture of the bridge camera dial above, there are also settings S, A and M? You can also see them on the DSLR dial in the photo below.
Remember when we discussed what affects exposure, and we said it was a combination of aperture size, shutter speed and sensitivity? I’ve ignored lens diameter this time as we can’t really change that on a lens (we might be able to CHANGE lens but that’s a different story).
Well actually this is not just a rough correlation, but an exact scientific formula based on what is known as the law of reprocity, which basically means that to maintain a correct exposure for a given amount of light, if you decrease the aperture you must reduce the shutter speed, i.e. slow it down and expose the sensor for longer, and if you open up the aperture you need less exposure time so you increase the shutter speed – speed it up – less time for the light to get in. Equally, if you lower or increase the shutter speed, then it follows that the aperture must open or close more to maintain the correct amount of light hitting the sensor. Let’s forget the sensitivity for now as this is always the last setting to change to control exposure.
This isn’t just information for the sake of it. There are good reasons why you might want to stick to a particular aperture or particular shutter speed (blog topics in themselves). And if you only have an auto exposure camera, you’re going to struggle to make the camera to play along. But on most bridge and all DSLRS you have three more settings available to you to help you achieve the correct exposure, and force your camera into submission:
S – Shutter priority. You choose the shutter speed, and the camera will use its built-in light meter to decide what aperture is required and set it on the camera. If the light level changes, the shutter speed is fixed and the camera will compensate by adjusting the aperture. If the level changes to such an extent that the camera can no longer set an appropriate aperture, normally it will flash some sort of warning at you, or beep, and may even lock the shutter button to stop you taking the photo. Quite annoying.
A – Aperture priority. You choose the aperture, and the camera controls the shutter speed. Again, if the camera runs out of options, it will warn you.
M – Manual. This allows you to set both the aperture AND shutter speed. You normally can access the camera’s meter reading somehow to get a clue what exposure settings you need. Why would you want to do this? Well, sometimes you will know that the light levels are such that your meter is going to be fooled and will give you the wrong exposure. Or maybe you want to deliberately do something creative that the camera would not normally set in automatic. I’ll give examples later. In manual, the camera display will probably warn you if you don’t have the correct exposure settings, but it WILL let you take the picture regardless. Manual is the hardest yet most rewarding setting. That’s for later.
With the DSLR I again have the option to go P – fully programmed and leave it to the camera, I can set S – Shutter priority or A – Aperture priority or I can go M – fully manual and set all the exposure settings myself.

In an effort to attract non-technical photographers with the hope of converting / training them, my Nikon even has what it calls the “Guide” setting, which basically gives you similar options to a compact camera e.g.

In summary
Well, that was a huge wad of information wasn’t it? What have we learned today?
Exposure is controlled by various settings on the camera which interact with each other in following a set formula, and it is fairly common that basic compacts do not give the user full control of these settings, but instead allow you to indicate the type of picture you are taking, to allow the camera to compensate during the auto exposure set up.
The more technical cameras allow greater control, or full control over all aspects of exposure settings, while still allowing fully auto programmed modes for those not wishing to get involved with exposure control, and concentrate on composition and subject matter.
Your mission, should you wish to accept it, is to decide how much control you think you will need or desire. Are you a point and shoot person, or are you looking to increase your level of photographic knowledge and expertise, and need the flexibility to manipulate your camera settings to the full in order to expand your creativity?
I’ll add that question to your choice checklist…
To be continued…

